Can Of Code

Some Simple WPF Tips and Tricks

Today its been raining all day, so its been the perfect excuse to do some more WPF practice. Below I compiled a small list of useful snippets of WPF related code which have helped me out.

1. Closing all other WPF Windows when closing a main window

Normally in an application your have a main WPF window that does some essential functionality. An example could be your web browser. The browser window is the main window and you may have an extra window which you can manage your bookmarks.

A quick and easy way I found to do this was create an event handler for the “Closing” event for the main window:

Closing="Window_Closing"


In the event handler we do this:

private void Window_Closing(object sender, System.ComponentModel.CancelEventArgs e)
{
       foreach (Window win in App.Current.Windows)
       {
            if (win != this)
            {
                 win.Close();
            }
       }
}


The real gem here is the App.Current.Windows collection, which does what it says on the tin and has a collection of all the windows that have been created in your application. An important part of the snippet above is that we make sure to not close the Window that the code belongs to otherwise you get an Exception, trust me I tried it!

2.  Open an Existing instance of a WPF Window instead of a new instance

Picture the scene, your creating an address book application and to add a new contact you have set it to bring up a new Add Contact Window. Once you finish you WPF application and release it out in the wild you get a angry email from Timmy, a frustrated user. For some reason they have 53 instances of the Add Contact Window open!

Now to keep poor Timmy happy what you need to do is before opening a new instance of your WPF Window you want to make sure that none are already open.

And using the same magic as above you do the following:

foreach(Window win in App.Current.Windows)
{
    if (win.GetType() == typeof(propertiesWindow))
    {
        win.Show();
        win.Focus();
        return;
    }
}

What we are doing is looping through the collection of WPF Windows within your application and then checking if any of the windows are of the type we are wanting to open. If it does find one with the same type it will show the Window to the screen, if not it will do nothing.


3. WPF Visibility Property

Before I started learning the wonders of WPF, I worked with WinForms. With WinForms, life was simple, a Form or Component was either Visible = true or Visible = false. Along comes WPF stomping all over WinForms and worst of all forcing its three states of visibility on us!

After I found out what that third state was, I was willing to forgive WPF because its pretty handy. the third state is:

usrAddBtn.Visibility = System.Windows.Visibility.Collapsed;

Collapsed makes the WPF Element not only invisible but doesn’t reserve the space within the Parent Element. What does this mean in the real world? well it means that you could collapse a Panel and place a new Panel in its placed. This means that instead of creating new WPF Windows for settings pages for example,  you can reuse the space of your main Window.

Posted in WPF |

C# Quick Tip – Painless Logins

Rather simple post this week. When using a login screen there is a feature that people have come to expect including myself.

Once you have entered your username and password which you may of done by using the keyboard and tabbing between the username and password text boxes. The final step would be to press enter as soon as you finish typing the password to be greeted with the next screen. A habit inherited from the web. So how do we do it in a C# WPF Application.

First step is to create a new event handler for the KeyUp Event of the password text box. In the event handler we want to do the following:

private void passwordTxt_KeyUp(object sender, KeyEventArgs e)
{
     if (e.Key == Key.Enter)
     {
         login(); // A method that does the login code
     }
}


To some it up, each time a character is pressed when the password textbox has focus it will check if the key is the Enter key.

Posted in WPF |

WPF / C# notifcations pop up

There becomes a point in a lot of applications where you hit the notification wall. I have recently been working on an RSS Reader to practice some concepts that are covered in the MCTS (Windows Application Development 70-511) exam.

I got the application working with data bindings and all the other WPF Wizardry and decided to start using it. I currently use Outlook to read RSS Feeds so I thought it would be worth seeing if what I had created was any better.  I stumbled across a real issue for me. It didn’t notify me when it had updated. This isn’t really a big issue is it? Well it really was, because I was hooked to applications telling me when something has happened for example, email, tweetdeck, MSN Messenger etc. Like below.

TweetDeck Notification window

A prime example of a notification window


Rather then give up with my application I thought, why not add my own notifications to it! So here is a little guide on how to add a notification popup to your application.


the form

we start by creating a Window. The Window will be what is displayed when the notification happens.

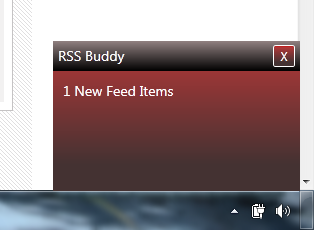
WPF Notification Popup


There are a few properties within the window we need to set to make it look right. Here is the XAML snippet for window

<Window x:Class="RSSBuddy.notificationWindow"
        xmlns="http://schemas.microsoft.com/winfx/2006/xaml/presentation"
        xmlns:x="http://schemas.microsoft.com/winfx/2006/xaml"
        Title="notificationWindow"  ResizeMode="NoResize" ShowInTaskbar="False"
        Topmost="True" WindowStyle="None" HorizontalAlignment="Right"
        VerticalAlignment="Bottom">


So lets explain some of the things we are doing:

ResizeMode = NoResize

This means the user wont be able to resize the notification window, which is fine because why would they?

ShowInTaskbar = False

We don’t want this window to have an icon in the taskbar because its not really a window people will see for long.

Topmost = True

This property is important to our notification window. The property forces the window to the front of the screen in front of any open applications. If we didn’t set this to true the notification window will end up getting lost behind other applications.

WindowStyle = none

This property means that we don’t have the border around the window or the close button and title. We set this to none so we can do our own title bar that fits better to the application.
HorizontalAlignment= Right & VerticalAlignment= Bottom

Both these properties are in charge of placing the window in the bottom right corner.

 Wait a minute…

If you create your notification window and run it, something bizarre will happen. Your notification window will appear not in the bottom right of the screen where you wanted it. This happens because it positions itself at the bottom right of its parent window NOT the screen. The way to overcome this was to tweak the code before the opening of the window:

  note = new notificationWindow(newitemcount);
  note.Top = main.ActualHeight - note.Height - 15;
  note.Left = main.ActualWidth - note.Width - 30;
  note.Show();


This code is what I use to open the notification window when something has happened. firstly we create the notification window object. Now to get over the problem of the misplacement. I go and manually set the notification windows Top and Left Properties. I set these by getting my parent screens ActualHeight (parent screen is set to Maximised by default) and taking away the Height of my notification window and then and extra 15 for good measure. This results in the notification window appearing where it should in the bottom right corner.

NOTE: If your parent screen is not Maximized you could use the following instead of the parent windows ActualHeight and ActualWidth (thanks to: StackOverflow Answer)

System.Windows.SystemParameters.PrimaryScreenWidth
System.Windows.SystemParameters.PrimaryScreenHeight


Posted in WPF |