Can Of Code

Grunt and npm

Why Grunt?

Having spent a lot of time in Visual Studio working on ASP MVC sites I hadn’t had a chance to really get my head around the new tools around managing dependencies and running build tasks because Visual Studio does a lot of that for you, with bundling and NuGet etc.

However  work dictated that I had to spend some time working on a WordPress theme which meant leaving the comforts of Visual Studio behind.

I have come to prefer Brackets as my text editor because of its simplicity and extension support. I had plugins that would minify JavaScript when saving as well as a LESS compiler which helped automate some of the common tasks but was far from perfect.

What made me investigate Grunt properly was the laborious process I was performing to make changes to the WordPress theme. At the same time I was working my way through the new Smashing Magazine’s Book “Real life: Responsive Web Design” which included an article explaining Grunt for people like me.

I already had Node installed so I was ready to have a go at grunting.

Grunting 101

In the root folder of your project you will create a few files that will keep track of what dependencies you have added to your project as well as to tell Grunt what you want it to do.

So first off you need to get NPM up and running so we can install grunt. assuming you already have Node setup all you need to do is run in a Command Prompt from within your root folder:
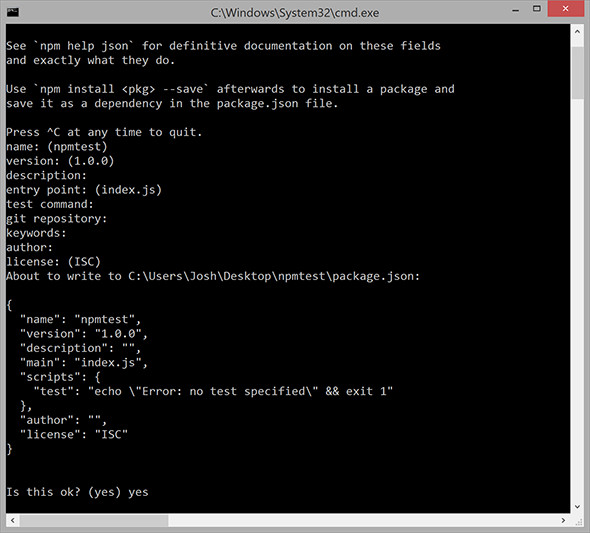
npm init

This will guide you through creating a package.json which tells NPM your projects dependencies. You can just keep pressing enter to power through it.

npminit

Next up we need to add Grunt as a dependencies so we can start automating. This is once again a single command

npm install grunt --save

The “–save” flag is important because it adds the dependency (Grunt) to the package.json. This means that when someone else comes along to work on your project. they just have to type “npm install” and all the project’s dependencies will get installed.

The next step is a little annoying, because unlike NPM, Grunt doesn’t have a “init” command so you have to create a new file in the root folder called “Gruntfile.js”. Your best step next is to copy the example grunt file from the grunt website or below:

module.exports = function(grunt) {

  // Project configuration.
  grunt.initConfig({
    pkg: grunt.file.readJSON('package.json'),
    uglify: {
      options: {
        banner: '/*! < %= pkg.name %> < %= grunt.template.today("yyyy-mm-dd") %> */\n'
      },
      build: {
        src: 'src/< %= pkg.name %>.js',
        dest: 'build/< %= pkg.name %>.min.js'
      }
    }
  });

  // Load the plugin that provides the "uglify" task.
  grunt.loadNpmTasks('grunt-contrib-uglify');

  // Default task(s).
  grunt.registerTask('default', ['uglify']);

};

Adding useful stuff

The example above uses a Grunt task called “Uglify” which can minify your JavaScript. Before this configuration will work you will need to install the Uglify NPM Package.

npm install grunt-contrib-uglify --save

That should do it. Now you can run:

grunt

Grunt will process it’s config and proceed to run “uglify”. Its likely that the task failed because your need to edit the config to fit your project setup.

This is the basic workflow of adding Grunt tasks.

  1. Install grunt package using NPM not forgetting the –save flag
  2. Add task to initConfig. An example of the config is almost always included in the readme of the package
  3. Tell Grunt to load the NPM package with
    grunt.loadNpmTasks("package-name");
  4. Add the task to the default registered task by adding it’s name (“uglify”) into the array [‘task1’, ‘task2’]
    grunt.registerTask('default', ['uglify','package-name']);

Get Grunting

Once you get the hang on of it, these tools can be extremely powerful. After a few hours of messing around I was able to:

  • Copy the files I wanted to deploy into a build folder
  • Combine and minify the JavaScript
  • Optimize images in the project
  • Deploy the output using SSH to the test server
  • Automate the whole process when a file in the source directory changes!

I will follow this blog post with a walk through of the Grunt file that handles all of this.  I hope this has inspired you to go and try out Grunt and NPM and in no time at all your be able to tell me all the cool things I have naively omitted.


Posted in Uncategorised |

My Oculus Rift Experience

In a moment of madness I decided to purchase a Oculus Rift DK2. The ordering process said to expect delivery to take 1 – 2 weeks however in my case it was just a few days.

oclusdk2

The general setup was pretty simple, with just one runtime to install.  There are a lot of cables and you will need at least two USB ports spare and a Full size HDMI port.

I was running Windows 8.1 which led me to the first problem.  The runtime I was using (0.4.4) had a display driver that stopped the device from getting detected in the control panel. I found after searching that this could be “Fixed” by uninstalling just the “Oculus Display Driver” within Control Panel.

No Device Attached :(

No Device Attached :(

From my basic understanding there are two modes the Oculus Rift can be run in. First is the Direct Mode which I was never able to get working on both Windows 7  and Windows 8.1. The extend mode is where Windows treats the Oculus as a secondary monitor which did work for me. However I found even the Extend mode to be very fragile with some apps working and some not.

After a lot of fiddling I managed to get the Demo Scene to work therefore giving me my first taste of VR!

The demo scene consists of a desk in front of you in a empty blue room of which you are stationary. Considering this is just a very simple demo its still enough to impress, I wouldn’t like to admit the time spent staring at a VR potted plant.


How about Steam Then

Steam has a VR mode which consists of the Big Picture Mode running in a semi circle in front of you. You can use the head tracking to look around the interface and use a keyboard to interact.

When trying to get Team Fortress 2 to run I ran out of luck. I either got the game running in a window on the wrong screen or the game just wouldn’t launch.

What’s next

I’m going to investigate into what enviroment (OS + Hardware) that others have had the best luck with. Failing that i may just wait until a new verison of the runtime comes along.

Should I get a Oculus Rift DK2?

Devs only!

Devs only!

I think there is very very good reason that the store asks you to agree that this is not a consumer product.  Its just not ready yet! I think its more the case that the software (Drivers etc) are just not ready for the masses.

If you really can’t wait until the end of the year when the Steam VR is due out, then go ahead and get a Oculus Rift DK2 BUT be prepared for it to not work, be prepared to spend a lot of your time trying different apps, different settings,  different operating systems to get something that works.


Posted in Uncategorised |

SteamOS on the Intel NUC

With the announcement of the HTC Vive there has been a lot of talk around Half Life 3 (mainly because HTC “mistakenly” said it was in the works). It gave me the urge to play some Half Life 2.

My next train of thought was how horrid it would run on my laptop so I decided to hit two birds with one stone and try SteamOS

Getting Steamy

I had a Intel NUC lying around which made the perfect candidate. The NUC has 8GB ram, an Intel i3 and a SSD with around 20GB storage.

The process of getting steam on to the NUC was pretty similar to installing any OS,  download the installer files then paste onto a FAT32  USB drive and your good to go.

What the EFI

After installing StreamOS, the machine restarted but no bootable media could be found.  In my daze of excitement I hastily Googled the problem which led me to an article suggesting a BIOS update should fix the problem

As I was too impatient I didn’t read the the BIOS warning that stated:

The memory reference code in BIOS version 0046 and later was updated as a part of the changes made in the BIOS to meet Microsoft Windows 8.1* requirements. This new memory code no longer supports 1066 MHz memory modules. Please review the Release Notes for more information.

Of course I was running some 1066Mhz RAM that was now no longer support. So I had to do some backtracking to  an older version and I was back to square one.

More Googling led me to this article which suggests the there is a bug in the NUC’s UEFI which means its looking for the EFI file in the wrong place.

Using the article mentioned above but adapting for SteamOS, I first had to boot from the SteamOS Installer but in the “recovery mode”. After selecting language and then loading a shell from the options provided. I then typed the following into the shell:

$ sudo mount /dev/sda1 /mnt
$ sudo mkdir /mnt/EFI/BOOT
$ sudo cp /mnt/EFI/steamos/* /mnt/EFI/BOOT
$ sudo mv /mnt/EFI/BOOT/grubx64.efi /mnt/EFI/BOOT/bootx64.efi

  A reboot later and I had SteamOS running.

No sound though

All was dandy except there was no sound. I turned on the desktop mode and tried a number of tricks via the terminal to try and get it to work, but had no luck. If anything I had made it worse as no sound card was getting detected at all. I proceeded to do the only thing I could do which was to try and reinstall again.  It did the trick! my theory was that when I first installed I didn’t have a network connection, so when it went through the “detecting hardware” stage it couldn’t get the drivers it needed? If anyone has a different theory let me know.

Impressions

The UI is exactly the same as Steams “Big Picture Mode” which is totally effective for a more console like experience. I found that in the games section it was a little annoying to have all the servers and utilities show up in the “games I can play” section but that was easily changed by changing the filter to “games”. I also found the store experience a little limiting, however you can always browse via the built in web browser.

So considering that the whole point of this exercise was to play some Half Life 2, I booted the game up (The full game is only 2GB! those were the days!).  What I wanted from SteamOS was the stability (most of the time) of consoles but with the keyboard / mouse input and SteamOS was able to provide this. There were a few glitches in the game but none that ruined the gameplay experience and I can imagine that porting the game from Windows to Linux wouldn’t have been a trivial experience.

Half life 2


Have a spare machine around and want to give SteamOS a try? I would say “go for it!” the installation process is simple but its still new and in development so do expect some issues along the way.

Posted in Uncategorised |